3D Prototyping using Texturama PNGs and keI2M add-on within Blender3D
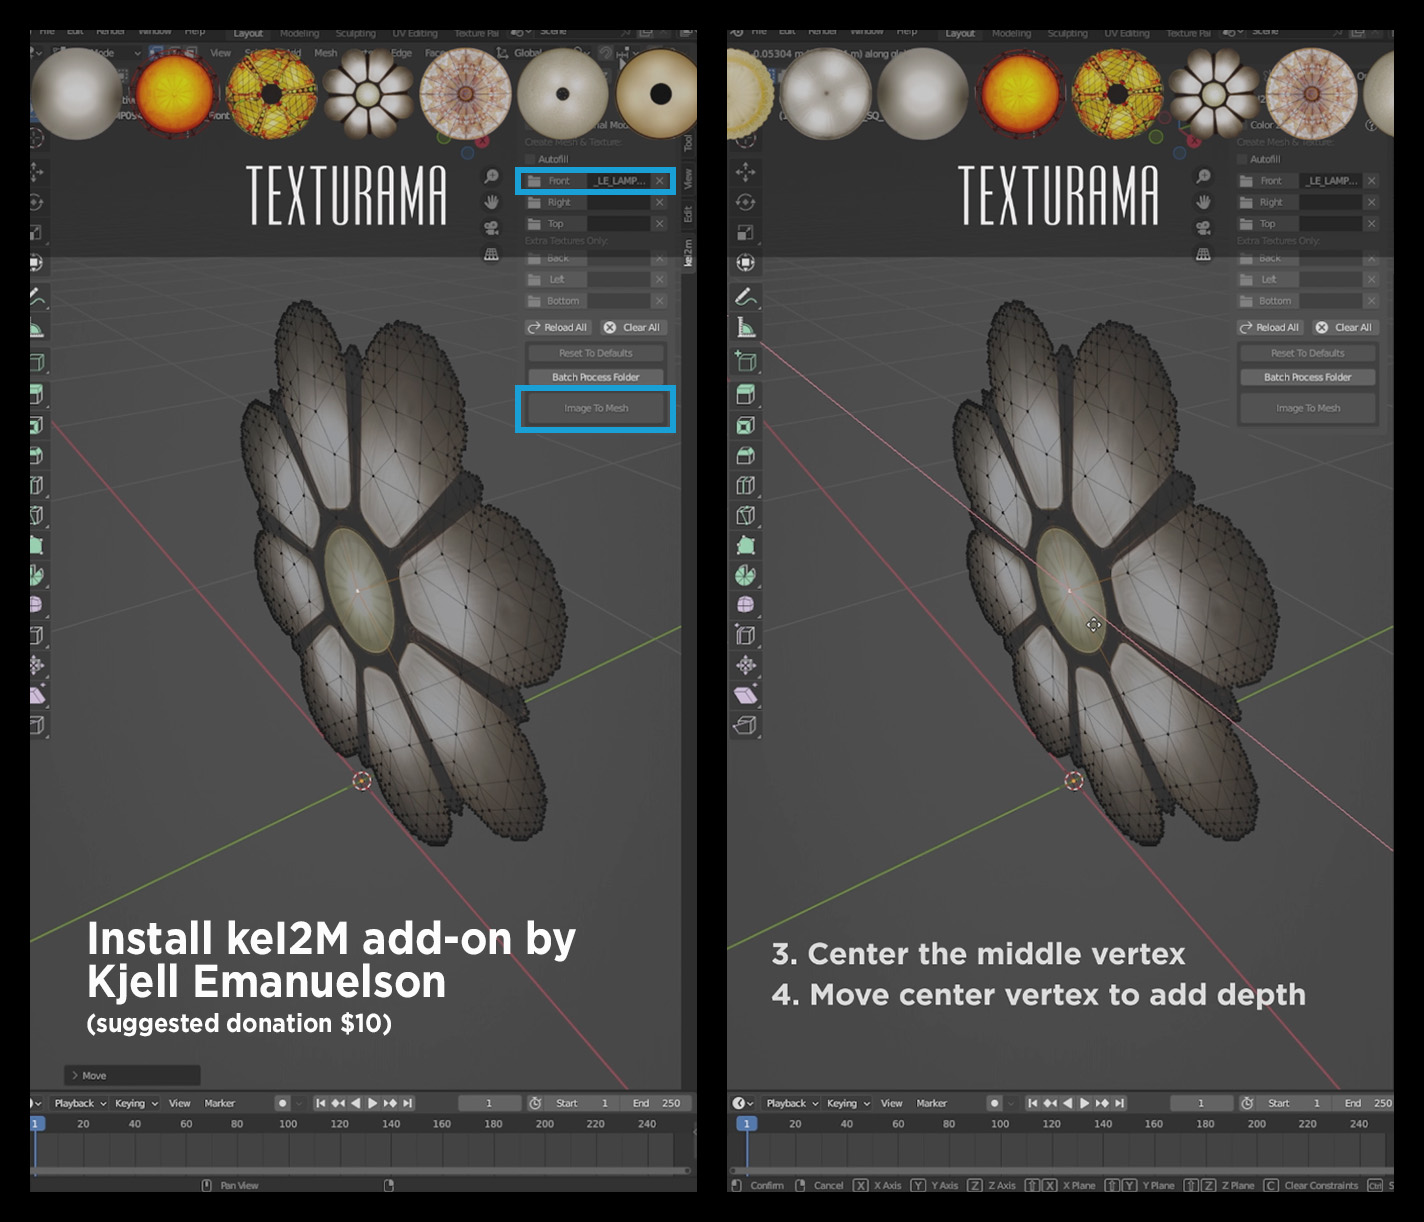
Here is a great Blender3D add-on which I have been patiently waiting on since, about, forever. Behold “Image 2 Mesh” (keI2M), which very easily converts a PNG texture into textured geometry, based on the outline shape of the alpha channel.
The script works great on simple outlines, and bases the geometry on pixel resolution (think stair-stepped outlines for curves), so it isn’t an end-all, do-all solution, but it works great with prototyping and quick geometry when you need it. The default is set at 128x128px stepping, however you can increase to 1024x1024 or custom if you like, however processing slows down as the numbers increase.
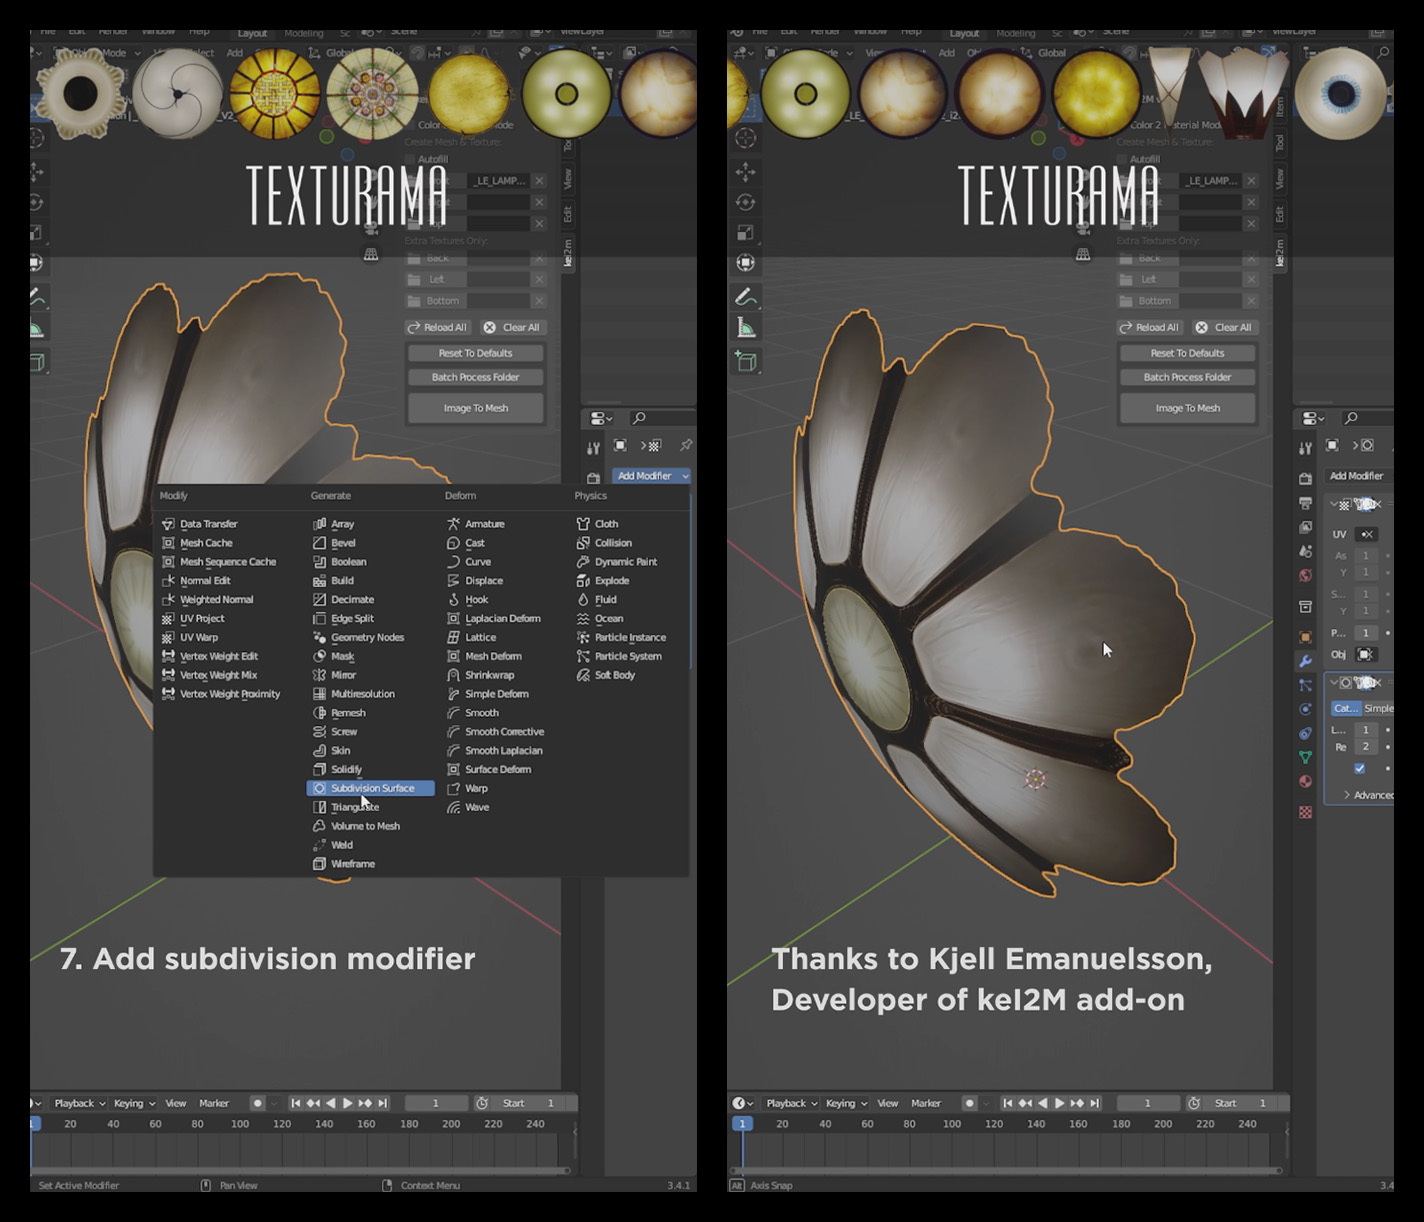
Many thanks to the developer, Kjell Emanuelsson who kindly distributes keI2M via donationware via his Gumroad account, meaning you can pay $10 or more for it if you are inclined. It is rated 5-star for 95% of its users, which says a lot, and Kjell has a decent history of supports and upgrades to it.
Since Texturama has quite a few texture maps that exist as PNGs with alphas, I decided to give it a go with one of our more detailed pendant lamp textures that is in our free sample section. As soon as I loaded the image, voila there was a flat mesh that had a radial-tree geometry, meaning the center had a vertex, and as the geometry approached the perimeter, it split off into more and more geometric detail. It was literally 95% of the way there!
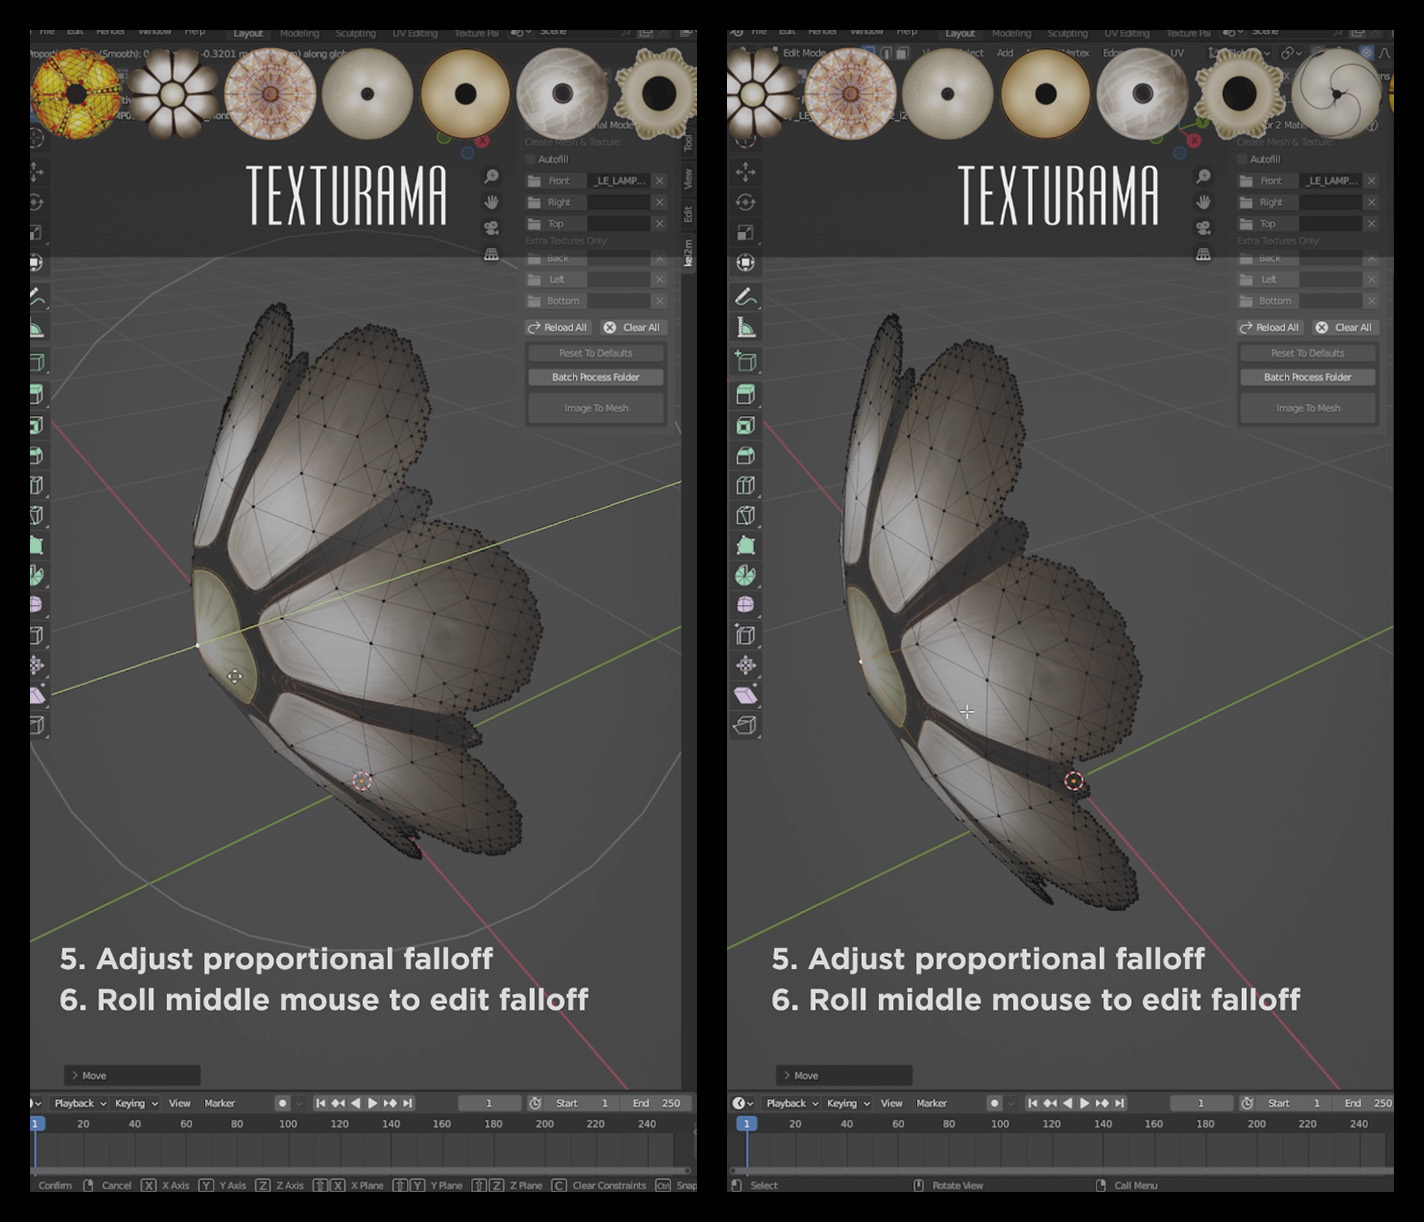
The only editing I needed to do was to slightly center the middle vertex, and the next step was to proportionally move the center vertex using proportional falloff editing within blender to give some depth to the form. Rolling the mouse-wheel gave instant feedback allowing to quickly lock-in on the desired bowl curvature.
And then add subdivision modifier to taste...
Although there are some built-in mesh reduction techniques, I imagine that there may be some alternative ways to use third party polygon reduction or remeshing techniques that can help to make this a very flexible solution. Some noise on the perimeter vertices along with proper welding thresholds mat simplify and smooth the perimeter.
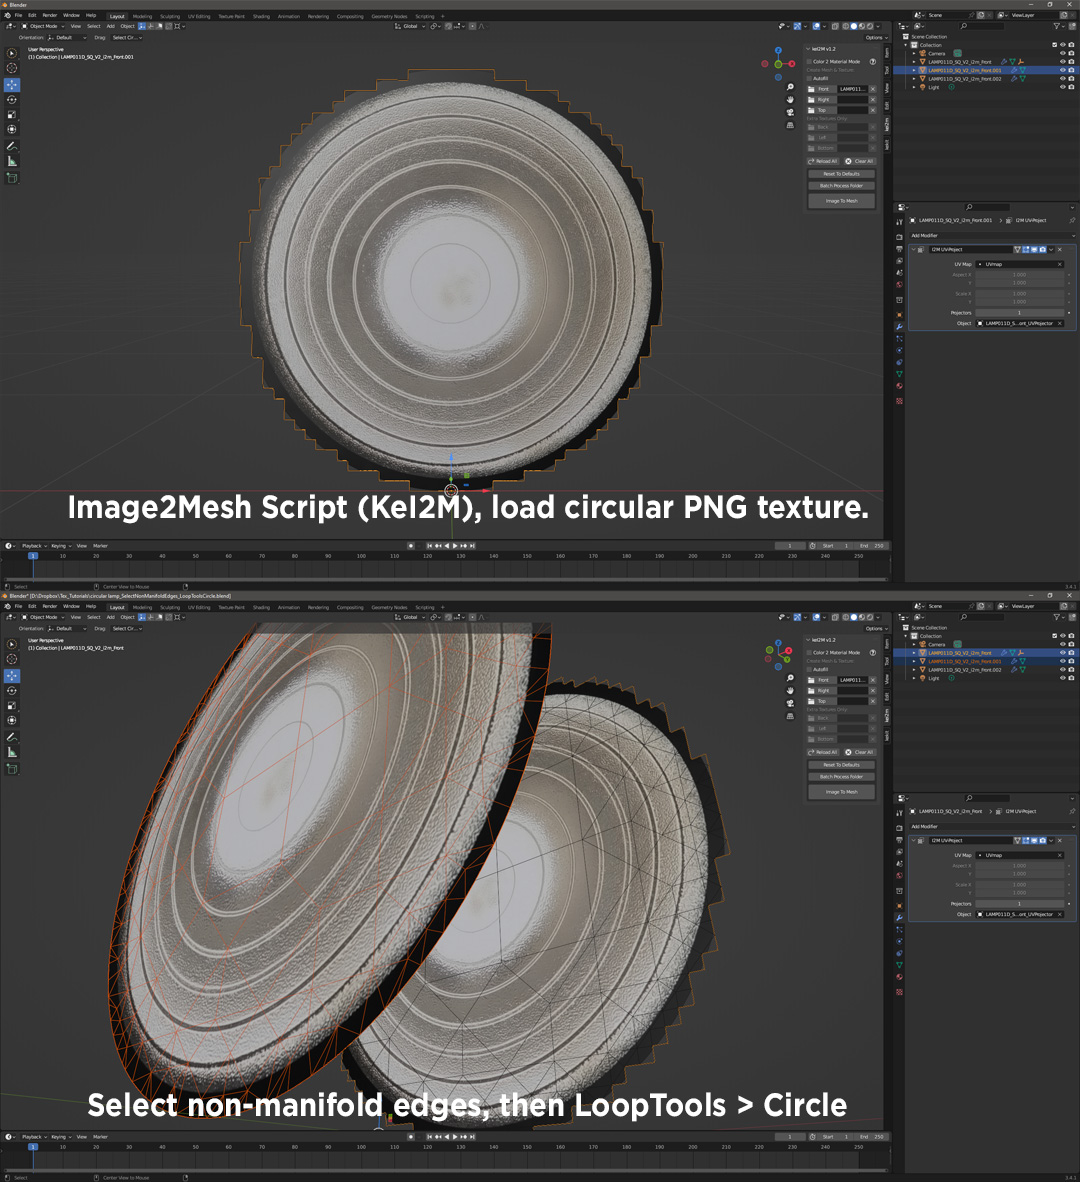
I did figure out a way to quickly smooth the perimeter vertices on a simple dish pendant lamp design. I used the same technique, loading a round lamp texture. The perimeter vertices were stepped, so I selected the perimeter edges by choosing a perimeter edge and then using selecting similar> non-manifold. Then choose LoopTools > Circle to make the edges perfectly circular.
Is this a lot of work for making essentially a hemisphere? Perhaps, but it is a quick way to bring a lampshade into Blender, and it would be worth some testing to see what's best for your use. Where this script may shine is for PNG textures, such as architecture facades that have more rectangular shapes and window cutouts. It is definitely worth experimenting with and discovering ways to optimize and smooth any perimeter curves by using other add-ons.
Have a look at Texturama’s lamps and other illuminated texture maps. Most can be applied using simple projection mapping onto hemispheres, rectangles, cylinders, and other simple polygons. The circular lamp textures may be applied to a hemisphere using the alpha channel for transparency, or alpha may be disregarded as long as the perimeter is modeled with detail.
While you are perusing Kjell’s scripts be sure to also check out his keKit add-on, which is an expanded modelling toolkit.
Don’t forget to use the image in the diffuse and in the self-illumination map slots. Enjoy!
Have a lazy look at the lamp collection in this scrolling video.
We use cookies on our website to give you the most relevant experience by remembering your preferences and repeat visits. By clicking “Accept”, you consent to the use of ALL the cookies.
This website uses cookies to improve your experience while you navigate through the website. Out of these, the cookies that are categorized as necessary are stored on your browser as they are essential for the working of basic functionalities of the website. We also use third-party cookies that help us analyze and understand how you use this website. These cookies will be stored in your browser only with your consent. You also have the option to opt-out of these cookies. But opting out of some of these cookies may affect your browsing experience.
Necessary cookies are absolutely essential for the website to function properly. These cookies ensure basic functionalities and security features of the website, anonymously.
Cookie
Duration
Description
cookielawinfo-checkbox-analytics
11 months
This cookie is set by GDPR Cookie Consent plugin. The cookie is used to store the user consent for the cookies in the category "Analytics".
cookielawinfo-checkbox-functional
11 months
The cookie is set by GDPR cookie consent to record the user consent for the cookies in the category "Functional".
cookielawinfo-checkbox-necessary
11 months
This cookie is set by GDPR Cookie Consent plugin. The cookies is used to store the user consent for the cookies in the category "Necessary".
cookielawinfo-checkbox-others
11 months
This cookie is set by GDPR Cookie Consent plugin. The cookie is used to store the user consent for the cookies in the category "Other.
cookielawinfo-checkbox-performance
11 months
This cookie is set by GDPR Cookie Consent plugin. The cookie is used to store the user consent for the cookies in the category "Performance".
viewed_cookie_policy
11 months
The cookie is set by the GDPR Cookie Consent plugin and is used to store whether or not user has consented to the use of cookies. It does not store any personal data.
Functional cookies help to perform certain functionalities like sharing the content of the website on social media platforms, collect feedbacks, and other third-party features.
Performance cookies are used to understand and analyze the key performance indexes of the website which helps in delivering a better user experience for the visitors.
Analytical cookies are used to understand how visitors interact with the website. These cookies help provide information on metrics the number of visitors, bounce rate, traffic source, etc.
Advertisement cookies are used to provide visitors with relevant ads and marketing campaigns. These cookies track visitors across websites and collect information to provide customized ads.